Excel Power Query Saves Time
In Microsoft Excel, you’ve probably seen Power Pivot and Data Model, but have you discovered Power Query? Power Query is a tool introduced in 2013, which is available to all users who have Excel 2016 or later and/or Power BI (It’s also available to download for Excel 2010 and 2013). This tool helps you extract, transform and load data from a variety of sources, such as Excel, databases, text files, XML, email, Word, and more. (Puls & Escobar, 2015) It can reduce the amount of time taken to pull a complex file together from over an hour to less than five minutes and should easily become a staple in the institutional researcher’s arsenal of tools.
A simple example of the usefulness of Power Query is a merge of two tables in order to pull together a query for the National Student Clearinghouse. To open the Power Query Editor, click on the Data tab on the ribbon, and, as shown in Figure 1, select Get Data
--> From File --> From Workbook, which will allow you to browse the list of Excel spreadsheets.
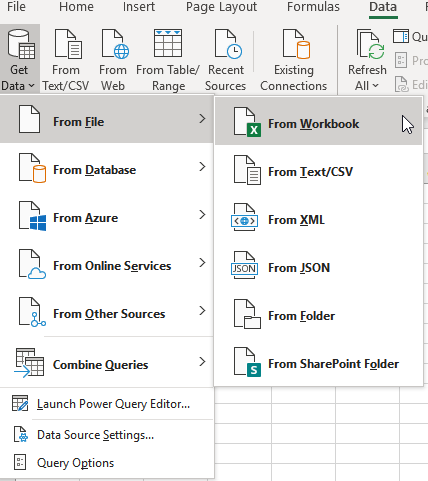
Figure 1. Opening a File into Power Query on the Data Tab
After selecting the first file (in this example I selected the sample OM data) a Navigator window (Figure 2) will appear to determine which data set to use; whether it’s one of the sheets or a previously defined table. The navigator will list each possible item. If data are pulled into a table, it will list both the sheet and the table and selecting both will cause duplicate data. That said, Power Query works well with tables, so converting the data range into a table using the option on the Home tab can resolve many problems. To work with Power Query, select Transform Data (or Edit).
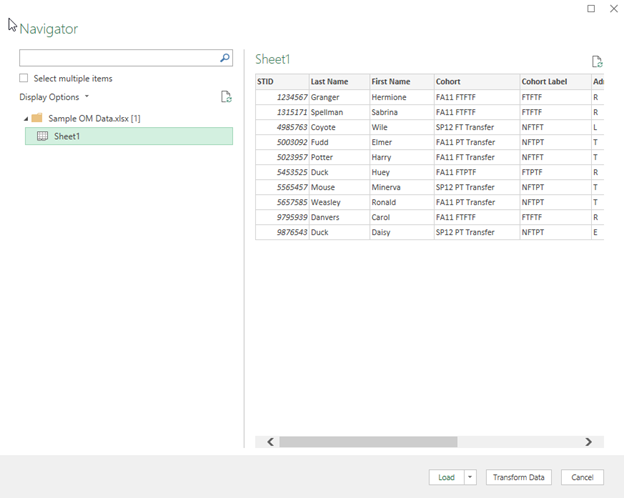
Figure 2. The Navigator Screen before Working in Power Query
Figure 3 shows how Power Query would look upon opening. To the right of the data in the Query Settings frame, each step is documented and the user can edit within each of the steps by clicking on the gear to the right of a given step. Please note editing or removing the steps can break the subsequent query steps made if one is not careful.
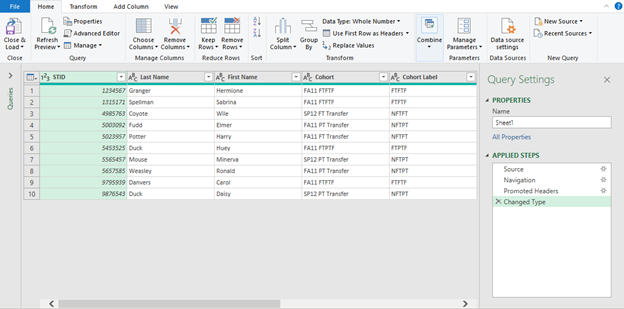
Figure 3. The Power Query Editor Window
Prior to the data merge, on the Home tab, select New Source --> File --> Excel (Figure 4). The browse feature is the typical open file dialog box used by Microsoft Office products. Upon selecting the file, the Navigator screen appears to determine which data set to use. The user should select the table name when using tables, or whatever sheet is of interest. Pressing OK will return the user to Power Query.
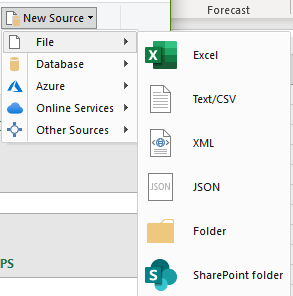
Figure 4. New Source on the Home Tab
Once both files are open, the merge can be completed. On the Home tab of the ribbon, circled in red in Figure 5 in the area of Combine, two options are provided: “Merge Queries” or “Merge Queries as New,” which results in a duplicate table. With Table1 highlighted, as emphasized by the blue arrow, select the preferred merging option. In this situation I would use merge queries to reduce the number of tabs added when closing out of Power Query. If you do not have a Table1, make sure whichever table you want as your primary table is highlighted.

Figure 5. Merge Queries on the Home Tab
A merge window will open (Figure 6), allowing for the selection of the table to merge, in this case Table2. Make sure the identification number is highlighted in both table samples, STID in Table1 and Id in Table2. The Join properties match that of SQL; the default option of Left Outer will provide all data in Table1 and whatever matching data are provided from Table2. Towards the bottom there is an indicator informing the user whether the join results in matching data. In this case it reads “The selection matches 10 of 10 rows from the first table.” Once the identifiers are aligned and the join is set appropriately, press OK.
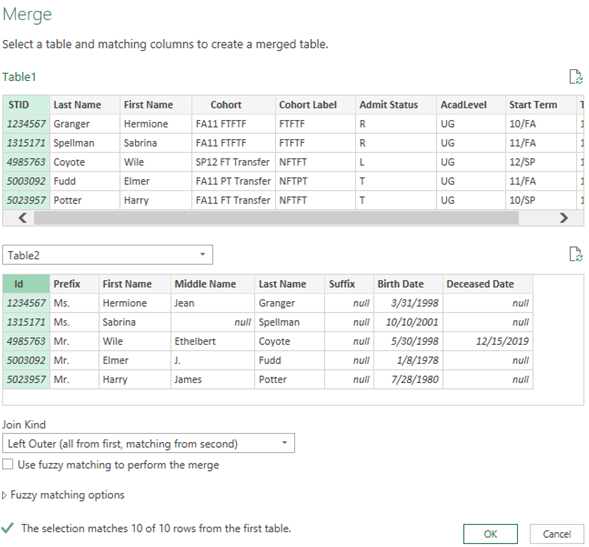
Figure 6. The Merging Tables Window
After pressing OK, the user will see Table1 with an additional column for Table2, as well as the applied step of Merged Queries. To see the additional columns, there’s a button next to the name Table2, which is known as the Expand button <| |>. Press this button to select which columns to add.
Upon expanding, the screen will display all the fields in Table2 for the user to add (Figure 7). In this case I removed “Id” as I already have it in the table. I’m keeping First Name and Last Name because I’m going to get rid of the versions from Table1. Below the list of columns is a check box to give the order to use the original column name as the prefix – Table2 in this case. While this is the default instruction, I usually uncheck the box. After pressing OK the columns from Table1 will be followed by the selected columns from Table2 in order.
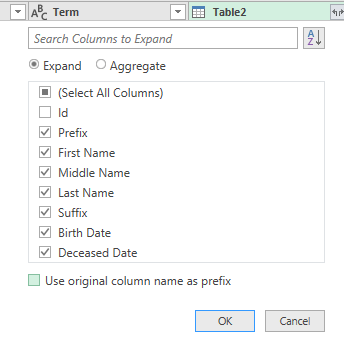
Figure 7. Selecting Which Fields to Add to the Merge
At this point the fields or columns can be rearranged in any order preferred by selecting several columns to move at once or one at a time, as is done in Excel. I use the Home tab on the ribbon and select Choose Columns (Figure 8), which then gives a list of all fields in order of placement (Figure 9). I simply uncheck the columns I wish to remove from the list and then press OK.

Figure 8. Choosing Columns on the Home Tab
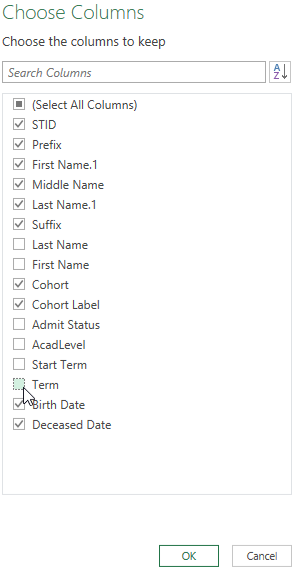
Figure 9. Check Boxes for the Keeping and Removing Fields
Because two fields had identical names, as seen in Figure 9, the additional first name and last name fields had “.1” added to the end of them. To rename, just right-click on the column to select Rename, as seen in Figure 10, and make whatever edits are needed.
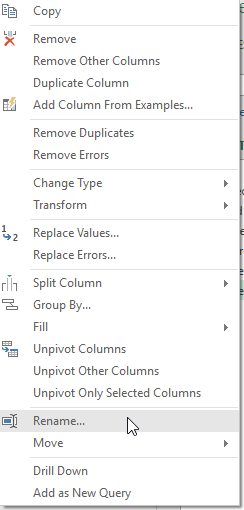
Figure 10. Right-Click Menu to Rename Columns
To finish in Power Query, click on the Close & Load shown in Figure 11. When back in Excel a new sheet will be added for each table used in Power Query, as seen in Figure 12. In addition, to the right a frame will appear for Queries & Connections, listing each table produced. The table will be green if there are no errors in the merge, otherwise the table will be orange. Columns will remain in the order supplied by Power Query, but now the user can work with the table with Excel functions or any other feature of Excel, including PivotTable.

Figure 11. Close and Load on Home Tab

Figure 12. Excel Spreadsheet after Power Query Merge
Power Query acts as a macro recorder, which allows the user to reuse this file to merge these data again and again. Just save over the old files using the same names with the same fields in the same place. To make this work, when the user reopens the file for the first time, press the Enable Content button, as shown in Figure 13.

Figure 13. Reopening the Excel File
Once data are enabled, press “Refresh All” under the Data tab on the ribbon. Data will be updated to the current file contents.
To view the Queries & Connections frame, press “Queries & Connections” on the Data tab of the Ribbon, as seen in Figure 14, and the frame will appear.

Figure 14. To Get the Queries & Connections Frame
There are several ways to return to the Power Query Editor. The Power Query Editor can be launched using the pull-down menu for Get Data, as shown above, and select “Launch Power Query Editor.” If the Queries & Connections is open, the user can right click on any of the tables listed and select Edit, as seen in Figure 15.
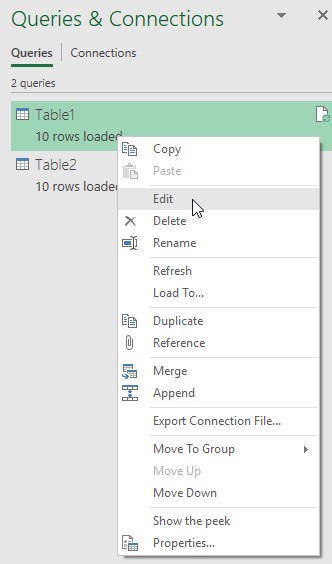
Figure 15. To Edit a Table in Power Query
References
Puls, K., & Escobar, M. (2015). M is for (DATA) MONKEY: The Excel Pro's Definitive Guide to Power Query. Merritt Island, FL: Holy Macro! Books
